Installation of the motherboard
WHILE THE MOTHERBOARD IS STILL NOT IN THE CASE
Install in any order the CPU, the memory sticks, the NBR heatsinks and any optional M.2 drives. Follow the directions in the motherboard's Manual.
BACK HOLE
If the case's internal "wall" does not have the typical square hole for the CPU cooler back shield, you will need to attach the CPU cooler now. This unfortunately makes it more cumbersome to install the motherboard into the case. Alternatively, if you have the necessary tools and skills, you may cut the necessary hole into the wall (I did it: it is not really difficult, and there is no need for a "neat" cut).
MULTIPLE M.2 DRIVES
Fitting and removing M.2 drives is not particularly difficult, but is certainly much easier with the motherboard still not in the case. If you have, say, two M.2 drives of different sizes, feel free to install both of them at this stage: the Windows 10/11 installer lets you select (by size) in which one you wish to have Windows installed.
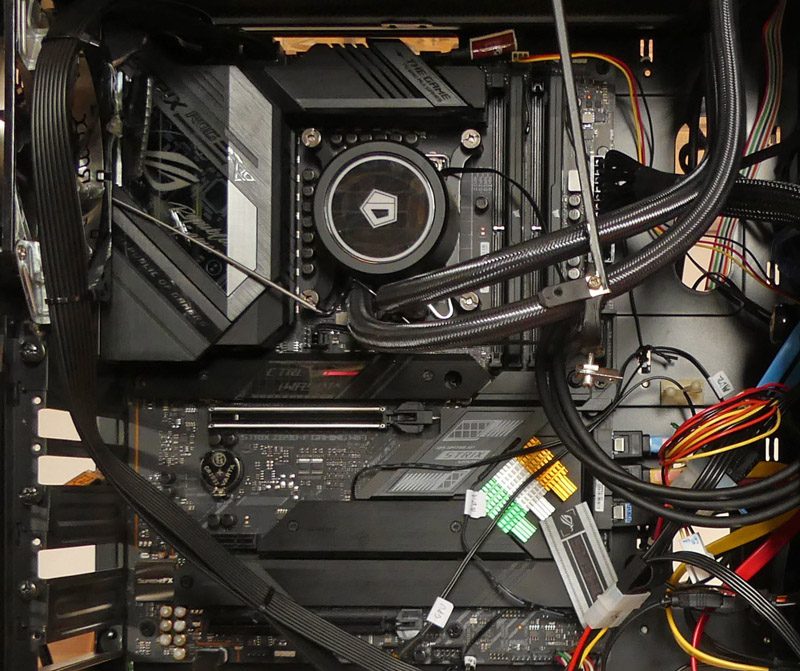
INSTALLING A WATER COOLER
The radiator is best placed against the case roof, and in any case it is best to do this before installing the motherboard, leaving the pump hanging around (best temporarily kept out of the way by means of a common green tie cable).
INSTALLING THE MOTHERBOARD INTO THE CASE
Installing the motherboard is very easy, just a question of first locating the tower case horizontally over a table, inserting (also horizontally) the motherboard and screwing the 9 retaining holes against their posts in the PC case. As in all motherboards and towers, the motherboard holes are almost 2mm wider than the screws: this means that there is a tolerance of about ±1mm for the motherboard position. You should first just insert the screws letting them loose, then you should press the motherboard to the left so that the back Shield (the part that includes all the USB and other slots) is placed firmly against the same-sized hole in the tower. Then, while you still hold the motherboard in place with the left hand, you should screw (firmly but not too tight!) the three leftmost screws. This sets the motherboard in place, and you can then proceed to screw firmly the other 6 screws: do not overdo this or else you may damage the motherboard.
INSTALLING THE PROCESSOR COOLER
With the motherboard inside the case, always in a horizontal position, install the cooler (or the water pump) following its manufacturer's directions. First do a "dry run" (without thermal paste and without screwing-in) to ensure that you can position the cooler or pump over the processor straight with no issues or obstructions, then remove the cooler.
Now add the thermal paste over the processor. Then ensure (perhaps with somebody else's help) that you are lowering the cooler/pump straight so that the paste is distributed evenly. Tighten the 4 screws progressively, until they have flattened the paste and they cannot go any more. Tighten them again a few hours later, and if possible one or two days later as well (they will let you turn a further 30º or so, implying about 1/10th of a millimetre, nothing to worry about).
GRAPHICS AND SOUND CARDS
If your processor has embedded graphics (which is the case with my choice of the 13500) then you do not need any PCIe card at this stage, because sound is catered for by the motherboard: all modern motherboards include a very capable audio chipset. The picture below shows our own STRIX Z690 motherboard at this stage, with no PCIe card, yet ready to install Windows 10 (or 11) with both graphics and sound.
Indeed, I find it best to install Windows with a minimum of devices, and Windows carries basic drivers for any graphics and sound devices. If however your CPU has the suffix "-F", then there is no graphics on it and you need to install a Graphics card at this stage. One way or the other, for best results, and especially when gaming or watching movies, you are advised to install later dedicated graphics and sound cards, with their drivers.
If you have two monitors, have only one plugged at this stage, otherwise your BIOS may show on the "wrong" monitor.
Once you install a dedicated Graphics card, the boot process and BIOS will always show in the "first" monitor that the graphics card "sees": this depends on internal circuitry and cannot be user-controlled. In most AMD Radeon cards, a monitor plugged to a DP (Display Port) takes precedence over another monitor plugged to a HDMI port: this means that the boot process and the BIOS will be shown on the DP monitor only.
POWER CABLES AND OTHER PREPARATIONS
At this stage you should plug into the motherboard the "EPS" power plugs from the Power Source Unit (PSU).
Supposedly you will also install your case fans, optional fan controller and temperature sensors. Note that, as soon as you power the PSU, the "Aura" display besides the shield (on the upper left hand corner of the motherboard) lights up with a changing colour display. It is possible to disable this from the BIOS, but is beautiful and also necessary, because the STRIXZ Z690 has no alternative "power on" LED: while the computer is either shut down or asleep, the Aura display is the only way to know whether the motherboard is getting power from the PSU. The Aura points straight up from the motherboard: therefore, if your tower case only allows for a front inside view of the case, the Aura will now point left and will be hardly visible at all. My solution was to insert, just next to the Aura, a small mirror at an angle of 45º.
PCIe CARDS
Once the PC is up and running with Windows installed, you will shutdown and plug any cards into the three PCIe slots of the STRIX Z690, typically:
- a dedicated Graphics Card in the PCIe slot 2 but also covering slot 3,
- a USB3 hub in the PCIe small slot 5,
- a dedicated Sound Card in the bottom slot 7, as far away as possible from the other devices.
Unfortunately, even a small card in slot 5 will partially obstruct the front fan of the graphics card. Therefore, it is very important that no further cables obstruct it and that the back fan has a full air supply, hopefully also helped by a case-side fan.