BIOS Flashback
Asus general advise is to avoid updating the BIOS unless something is wrong with the STRIX Z690. However, if we have a 13500 CPU, there IS indeed something wrong: the CPU 13th Gen incompatibility! Unless you have an Intel 12th Generation chipset at hand to be used temporarily, a Z690 BIOS will not run at all. Luckily, this issue is cleverly resolved in the STRIX Z690.
It is strange indeed that this motherboard (including my own unit manufactured as recently as February 2023) comes with a BIOS that is incompatible with 13th Gen Intel CPUs. Some webpages advise to find a "cheapo" Celeron LGA1700, install it and run the BIOS's Asus EZ Flash utility. At least in this particular motherboard, this advise is NOT to be followed! This is because, as observed in other websites, the STRIX Z690 has a much better built-in solution: the Flashback.
In this respect I have found that both the manual of the Asus motherboard and some websites have different errors and even missing steps. So I have put together the following foolproof (and proven!) directions. The procedure is long, but every step is very easy to carry out.
-
 Go to the Asus STRIX Z690-F webpage and download the file ROG-STRIX-Z690-F-GAMING-WIFI-ASUS-2703.zip, or else any newer version of it.
 - Unzip the above file: it contains two files, a *.CAP file and a BIOSRenamer.exe file.
- Use a file manager to rename *.CAP to SZ690F.CAP, or else run BIOSRenamer.exe, which performs exactly the same file renaming.
- Prepare a USB flash key with the following specs:
1) It should be USB2, not USB3,
2) It should have a disk-activity LED,
3) Its capacity should be greater than 1 GB,
4) It should be formatted in a single FAT32 MBR partition.
To ensure MBR, go to a Command Prompt, enter diskpart, list disk, select disk ? : if it shows an asterisk below GPT, enter clean, convert MBR, and finally again list disk to verify that the asterisk is gone. My own USB key was fine and did not need any change. - Copy the file SZ690F.CAP onto the USB2 flash key.
- Have the motherboard installed into a case with a Power Supply Unit installed (you can also have a CPU, RAM or GPU installed, but these are not required for the flashback procedure).
- Replace the motherboard's CMOS CR2032 battery with a fresh one (3.3V).
- Connect to the motherboard the ATX power and the EPS power plugs.
- Connect the PSU to the mains.
- Switch the PSU on. Do NOT press the PC's case start button!
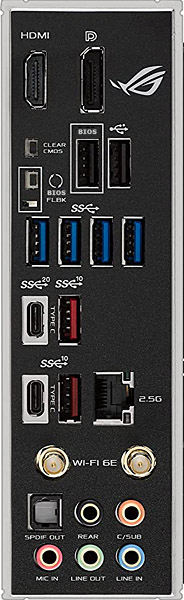
- Go to the STRIX Z690's back Shield (see the picture) and press the CLEAR CMOS button: this deletes prior BIOS settings, but then you should have none at this stage.
- Insert the USB key into the BIOS FlashBack port, the one with "BIOS" written above it.
- Press the BIOS FlashBack button (the one just left of the "BIOS FLBK" label) for three seconds until the LED next to it starts blinking, indicating that the BIOS FlashBack function is enabled.
- The USB key LED will also go on showing it is being read.
- Wait for 4 to 8 minutes until both LEDs go off, indicating that the BIOS updating process is completed.
- Shutdown the PSU and disconnect the USB key.
- Should the BIOS FLBK LED flash for five seconds and then turn on continuously, the BIOS FlashBack has failed to operate properly: switch everything off and restart the whole procedure.
- Confirmation: once the CPU is installed and you can boot the computer to BIOS [for this you need: Motherboard, PSU, Monitor and Keyboard, but you do not need to have Windows installed or any drive running], on top of the BIOS Main Menu you can read the updated BIOS Version.
I find that the above initial BIOS Flashback is a very easy and safe procedure and I suggest to perform it initially even if you intend to install a 12th Generation intel Core processor (and therefore if may look unnecessary). My reasons are many: an initial BIOS Flashback will update the firmware of both the BIOS and the Intel ME, yielding an updated starting point for the building of the PC. Further, you have no issue if you later wish to replace the processor with one of a later Generation..